The Remote Desktop Connection application is part of Windows and allows the user of a host PC to connect remotely to a PC, whereby applications and files can be accessed and operated. Please follow the instructions below to use the Remote Desktop Connection application to connect to your UA Work PC.
THESES INSTRUCTIONS ARE FOR WINDOWS COMPUTERS ONLY. IF YOU’RE USING A MAC COMPUTER, PLEASE CLICK HERE FOR INSTRUCTIONS.
TIP: You may want to print these instructions before continuing, since you’ll need to perform most of the actions on your PC at home.
1.)The host PC (the PC in your office) must be turned on. It does not have to be logged on with your username and password, just turned on and must remain on.
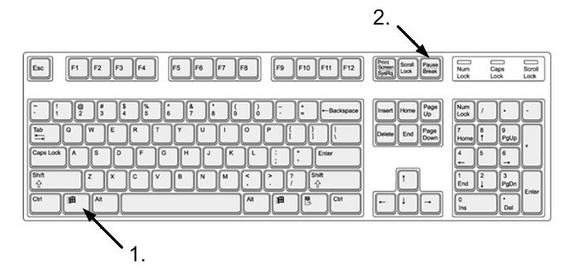
2.) IMPORTANT: THIS SHOULD BE DONE ON THE HOST PC (the PC in your office). You must make note of the FULL computer name of the host PC (the one in your office) BEFORE you attempt to control it remotely. You can do this by holding down the windows key and pressing the pause/break key on your keyboard.
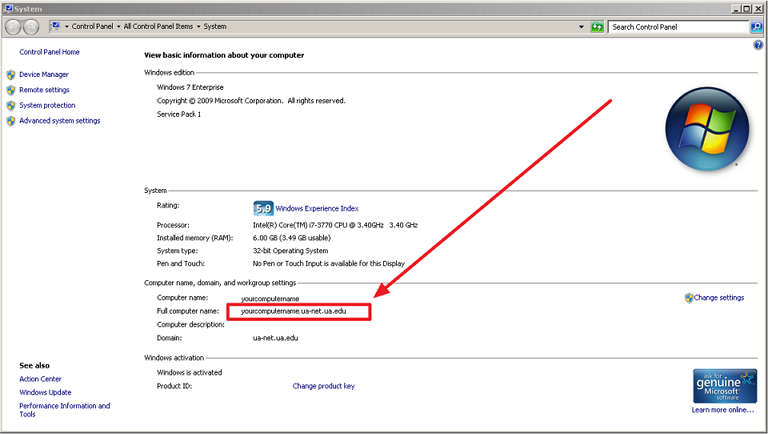
You will then see the following window popup:
Look for the “Full computer name” of the PC and make note of this. You’ll need this when you get to the remote PC (the PC you’ll be sitting in front of for the remote session).
3.) You must connect your remote PC (the PC you’ll be sitting at) to the internet (high-speed internet is recommended).
4.) You must have UA’s Cisco Anyconnect VPN client installed on your remote PC (the PC at your house). If you’ve not done this, please click here for instructions. IMPORTANT: YOU DO NOT NEED THE VPN CLIENT INSTALLED ON YOUR OFFICE PC.
5.) Connect the Cisco Anyconnect VPN client by logging in with your MyBama credentials. IMPORTANT: Enter your myBama credentials in the username and password fields. The “Second Password” field is for DUO. You have three options to authenticate with DUO. You may type “push” to receive a push notification, “phone” to receive a phone call, or enter a passcode from the DUO app. You will need an active DUO account to obtain VPN access.
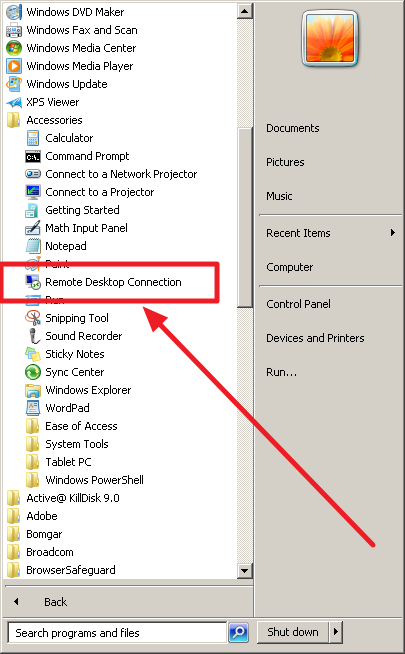
6.) On the remote PC (the PC outside of your office), you’ll need to launch the Remote Desktop Connection application. Click Start – All Programs – Accessories – Remote Desktop Connection
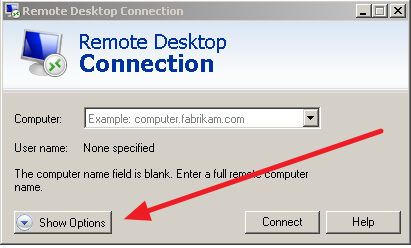
7.) Once the Remote Desktop Connection application opens, click on the “Show Options” button
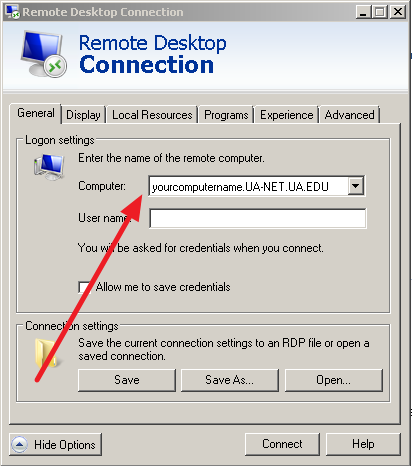
8.) Next, enter the FULL computer name for the host PC (the PC in your office) in the “Computer” field. IMPORTANT: The computer name must end in UA-NET.UA.EDU
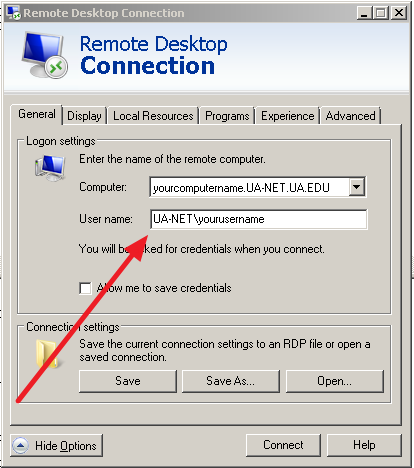
9.) Next, enter your username in the “User name” field (this is the username you use to log into the PC in your office). IMPORTANT: UA-NET\ MUST appear directly before your username (see below). Don’t forget the slash:
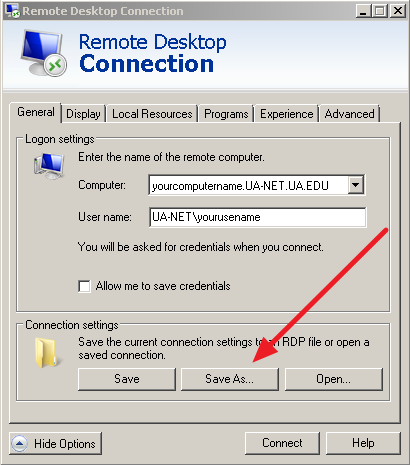
10.) Click the “Save As…” button to save an icon for this connection to your desktop
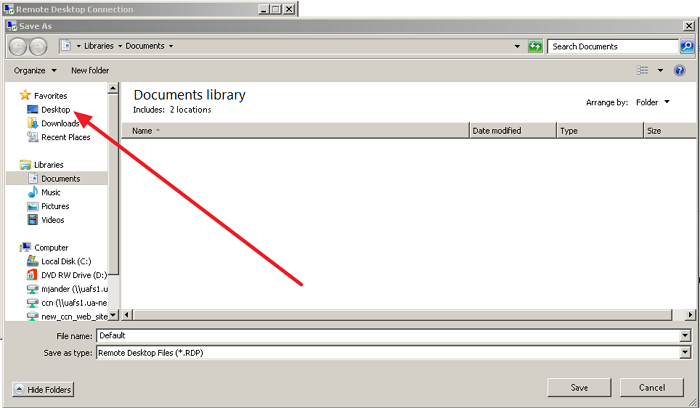
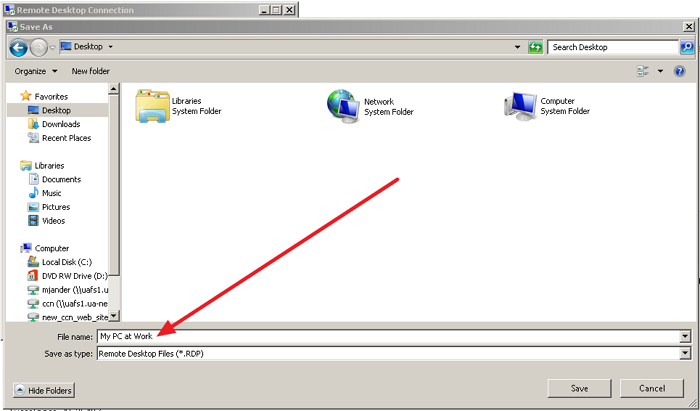
11.) When the “Save As” window appears, click on the “Desktop” choice for location
12.) In the “File Name” field, name the icon you’re creating. You can use something like My PC at Work or My Work PC
13.) You should now be able to find an icon similar to the one below on your desktop:
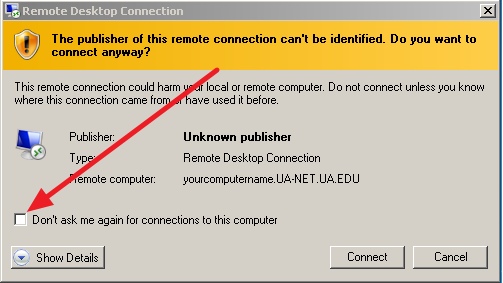
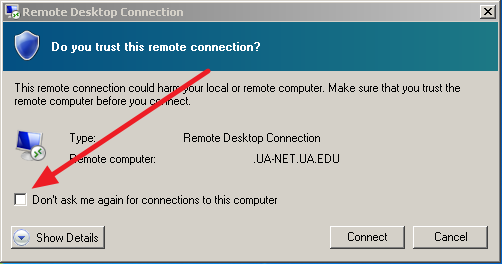
14.) Double click the new icon to launch the Remote Desktop Connection application. You may receive a popup window that looks like one of these. Simply check the “Don’t ask me again for connections to this computer” and click “Connect”
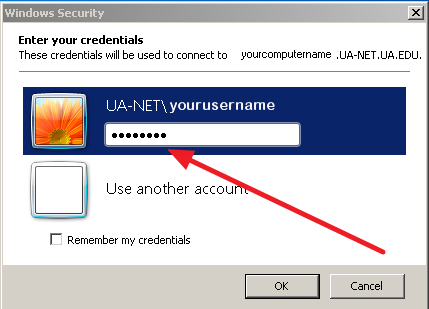
15.) You should then see a popup window requesting you enter your credentials. IMPORTANT: You should see the username you entered in step 8. It MUST begin with UA-NET\ or your login will fail. IMPORTANT: The password you enter here must be the one you use when LOGGING ONTO THE PC IN YOUR OFFICE.
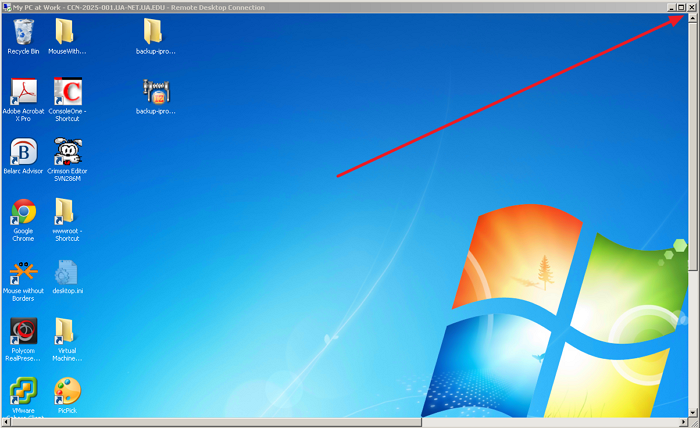
16.) After pressing “OK” in step 15, you should be presented with a window displaying the contents of your host PC screen (the PC in your office). At this point, you now have the capability to move the mouse pointer on the host PC, open applications, and edit files. When you’re finished controlling the host PC, simply press the X in the top right corner of the window to exit the Remote Desktop Application.
17.) In the future, when you wish to access your office PC remotely, simply look for the icon on your desktop (seen in step 13). Connect the Cisco AnyConnect VPN client and then follow steps 13 through 16 to access your work PC.
IMPORTANT: When you’re finished working with the Remote Desktop Connection, please be sure to disconnect from the UA Cisco AnyConnect VPN client.
